Replica Lightsaber
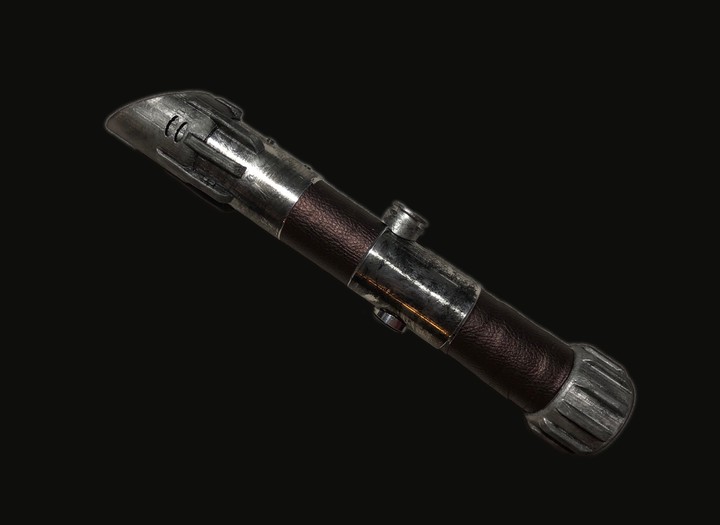 The final Product
Since I was about 6 years old or so, I’ve wanted to have my own Lightsaber. I grew up watching Star Wars and Star Trek, and loved playing with all the associated toys and gadgets. But the one thing I never had was a lightsaber that felt “real”. I’ve always contemplated building a lightsaber and there have been attempts in earlier years. But I never brought any of those projects to completion. However, this year was different. This time I finished it, and boy is it cool.
Where It Started
I began with some research into the lightsaber construction world. There are a surprising number of resources available. I made a sketch of roughly what I wanted the hilt to look like

After I had this rough design laid out, I began to search for parts. I had run into a website called UltraSabers, who make custom lightsaber chassis as well as fully prebuilt sabers. After browsing their selection I bought a hollowed out hilt called the Initiate V2. It is one of their cheaper options and is small enough to hold in one hand and twirl.

With that on the way I turned to the internal components and the additions I wanted to make to the exterior. For the purposes of this post, I will start with the internal components.
Internal Parts
For the internals, I turned to a supplier called The Custom Saber Shop, who supply nearly any and every part one could need for creating their own lightsaber.
After doing some more research and calculating the resistor requirements, I finalized on this parts list:
- 16mm Anti Vandal Short Momentary Orange Ring Switch
- Nano Biscotte Sound Module V4
- MHS speaker mount V6 - For 28mm Speakers
- Kill plug style 3
- Switchcraft 2.1mm Power Jack
- Li-Ion 18500 3.7V 1400mAh PCB Protected Rechargeable Battery Module
- 3.7V Li-ion smart charger with 2.1mm plug
- GikFun 28mm Speaker
Now you may notice that this list does not include the LED and resistor itself. This is because I already had one from a previous project. But if you want to complete this project yourself, there are plenty of good options that will run well, even off of the 1400mAh battery.
Once these parts arrived, I set about wiring them together for a test setup of my saber. This took a little while, as the NanoBiscotte board, while fantastic, is somewhat difficult to solder on to due to it’s small size. Below is the wiring setup.

As far as the actual wiring, if you are attempting to recreate this there are far better guides on the internet, so I would refer you to that. My only tips are to make sure you cable manage well with lots of electrical tape(rather than zip ties, to save space), and to heat-shrink every single connection, as there are many opportunities for a short circuit inside the metal chassis.
Due to the small physical size of the Initiate V2, the MHS speaker hilt will need to be modified to fit inside the hilt. I ended cutting off the top inch or so, but if you are replicating this project, base the size on your hilt.
Physical Modifcations
Before inserting all the components into the hilt one must first drill two holes into the hilt. One in the removable pommel of the saber and another where you want the recharge port to sit. In my case this was on the reverse of the switch hole, plus an inch.
This is best done using a drill press and vice. It’s important to start with a small carbide drill bit, and then gradually work your way up.


Based off of my earlier plans, I next wrapped the hilt with faux leather. This was done to shave off some cost, however it simply doesn’t look as good as real leather. So for an upgrade I will likely replace it with a real hide. I opted for a wrap on the bottom grip point, and a simple one layer straight application on the top point.

Next it was time to weather the hilt to provide a more aged and “authentic” look. Though there are many ways to weather a prop, I opted for the paint method. To do this simply take a can of black paint and apply liberally to the saber, then allow it to dry for a few seconds, wipe off a large amount of the paint. Repeat this process until you have the look you desire. After allowing the paint to dry, you will want to spray a clear coat (I used the rustoleum brand) over the painted areas and allow this to set overnight.
WARNING DO NOT USE THE CLEAR COAT ON 3D PRINTED COMPONENTS, IT CONTAINS ACETONE WHICH WILL MELT THEM.
Also do remember to mask the areas you do not want to weather such as the switch, recharge port, leather, and light emitter with masking tape. Electronics and Paint do not mix

The final step is the 3D modeling and printing of the emitter and new pommel. First I measured the Initiate V2 using a pair of digital calipers. From that data, I was then able model a pommel and emitter that fit the saber and reflected my original design.


These models were then printed and prepared for painting. This involves heavy sanding and removal of support material. From there I put on a grey primer coat, and once that was set, went back with silver and then black to weather the look. I then went over all the pieces of the lightsaber with a wire brush and sandpaper to add some scratches.

Final Assembly
For the final assembly, make sure you place the components inside the saber in a logical order. For me and the way my holes were aligned, this meant first placing the switch, then the recharge port, and finally dropping the emitter assembly along the side of the hilt. Here’s what the completed saber looks like:

Test!
Here’s a short video showing me swinging the saber around showing the sound reacting to the movement of the saber.
Iain Zwiebel
Biomedical Engineer
Iain Zwiebel is a Biomedical Engineer committed to creating positive change in the world through human centered design, particularly in the health sector.